20.2 Release 16-10-2020
- 22 Dec 2020
- 13 Minutter at læse
- Print
- MørkLys
- pdf
20.2 Release 16-10-2020
- Opdateret til 22 Dec 2020
- 13 Minutter at læse
- Print
- MørkLys
- pdf
The content is currently unavailable in Danish. You are viewing the default English version.
Artikel resumé
Fandt du dette resumé nyttigt?
Tak for din feedback
Introduction
16.october 2020 is the official release date of version 20.2 of MainManager FM. Here we will list up and introduce the new features that this release contains. Some of these additions are quite general and noticeable for all users while others are specifically related to a particular module or process within the system.
If further information is needed please contact your MainManager contact, send an inquiry to info@mainmanager.com or call us at +354 412 8600.
General additions and changes
This chapter will describe some of the changes and additions that are general and are likely to have affect on large number of users.
Address lookup
MainManager FM now offers a lookup through some global web services (API) to register address for objects and organisations. The following web services are used:
- DAWA for Denmark
- GeoNorge for Norway
- Staðfangaskrá for Iceland (through MM central serviceweb)
- Geoapify (Default)
Selection of which API is used is made through global settings (System Configuration process). Automatically after this update the database will be set on the API based on the culture (also a global setting). This will then apply to all registration on addresses like in site, building and organisation registration. Notice that you should be as precise as possible while searching since the data set can be quite large and the results returned are limited.
 Searching for address in building window (Geoapify)
Organisation lookup
We have improved our lookup for organisation data in Denmark and Norway. This means that you can search for organisations in those countries and register information in MainManager based on data fetched from two web services provided by
- CVR - Det Centrale Virksomhedsregister (Danmark)
- Bronnøysundregister (Norway)
This registration is made with an action from the company module called Import company from API. You select either the danish or norwegian API in the country field, write a search string, either from the name or identification and press Enter or magnifying glass to get the search results. Below you see the first search result, and in the drop down list at the bottom you see other options (max 20) if available. You select the one you want to import and execute the action.
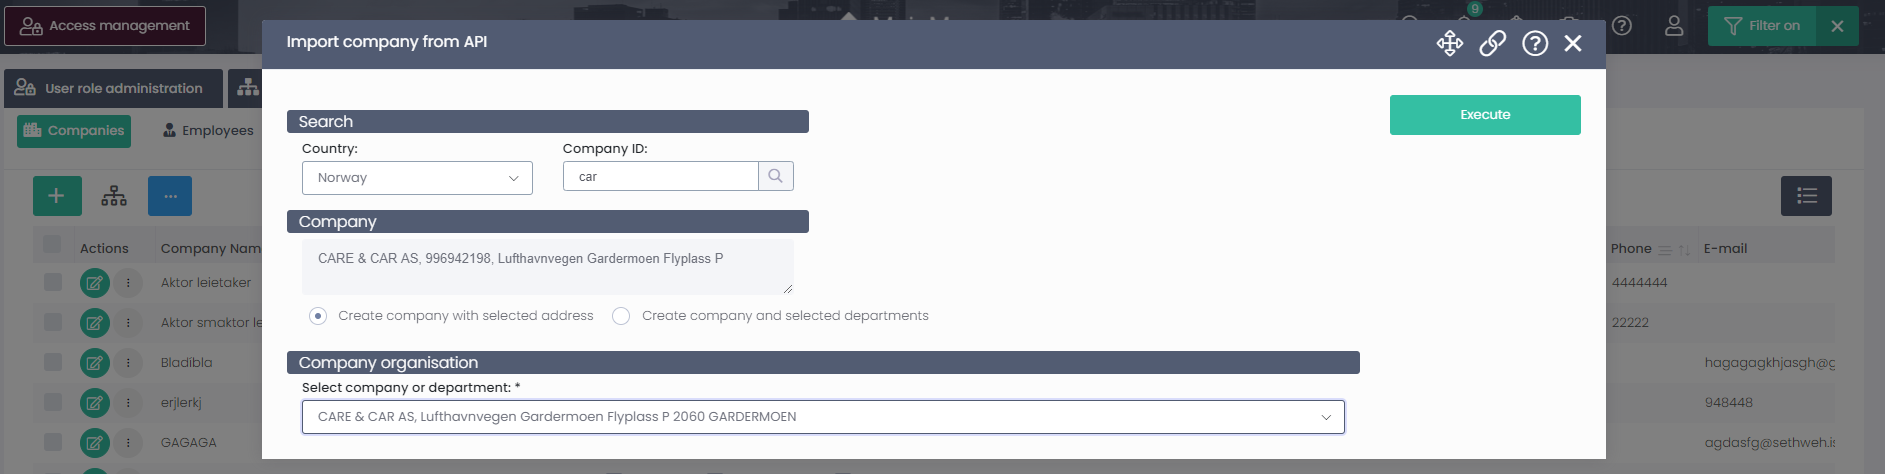 Importing company from Norwegian API - Bronnøysundregister

Company is imported with its ID and address and will be visible in the company list.
Data in current module shown on GIS map
After this update you will be able to view information from the module you are working in through the GIS map, that is if the data is connected to a site or a building located on the map.
Example: Work orders
On a specific building that you have selected in the top filter, there are two work orders. When viewing the GIS map you can choose to view work orders on the map, then press the number that appears on the map. Then an icon for each work order is shown where you can right click to open.
 Work orders displayed on GIS map
GPS Coordinates for locations
When the selected object (site or building) in the top filter does not have a coordinate on the GIS map, there will now appear a message on top of the map indicating that no coordinate is registered and a link to a documentation on how to add that info.
 A message that appears when a site does not have any GPS coordinate
Base info
We have made some improvements on the information that is visible when clicking the Base info icon above the list.
This is now showing same information as are shown in the property box for the selected object, and the user can also access sub data directly from here. The information shown are corresponding with the access that this user has to this module.
 A screenshot from the Base info (above) vs the property box (below) for an object. Information is the same both places.
Quick actions
Now it is possible to set up actions that should be available through Quick actions. This is adjustable on a user role level and the setup is made through System configuration > System settings > Global action menus.
 An example of a users Quick actions menu
Boolean fields in filters
Instead of showing boolean fields in filters as a checkbox, they will now appear there as drop down lists with three options Nothing selected, Yes, and No. This means that it is possible exclude some data from the filtering.
Example : Check word list
- You want to view all check words weather they are marked as Failure or not - mark Nothing selected (which is the default)
- You want to view all check words of type Failure - mark Yes
- You want to view all except the check words that are of type Failure - mark No
Example 2: See picture below
 Example from the check word list filtered on showing all that are of type Failure and Issue, but not of type Release item
Drag modal pop up windows around
Users can now toggle pop up windows so they become draggable. This is especially usable when you want to see some information from behind the window i.e. from the list. Simply press the toggle button in the upper right corner of the window, and then you can move it around. This change applies to all registration windows.
 Toggle button has been pressed
 User has moved the registration window lower on the screen
Edit records through lists
Some data in the system are now editable through the list instead of having to open the record to change them.
 Examples from list data that can be edited directly
Notice that there are some rules that have to be fulfilled for this to apply. That is when
- Module has been modernized (fully supported in MM FM)
- User has access to edit this data
- When field is marked editable in code and is not locked
Module icons
In this release users might notice that icons are displayed more frequently all around the system, like in drop down lists. We have attached a unique icon for each of the most used modules and whenever a data from this module appears, the icon is displayed in front of it. This makes the system more graphical and users get acquainted to what data is in each field.
Two examples are shown in the pictures below
 Site icon (on left) and Floor icon (on right)
  Icons displayed in work order registration window
Changes related to specific processes
Here we introduce some new features that are related to specific processes. Notice that some of them are configurable on a user role basis so they do not come automatically visible to all users after update.
Building archive
Following additions are specifically related to building archive process.
Improvements on how you select main object in drop down lists.
When you open a drop down list that contains an object tree, you might notice that there are some icons on the top of the drop down. By clicking these icons you change how the tree is shown and this makes it easier to navigate to the object you are looking for.
Here is an explanation on the functionality behind each icon.
Housing
When you press this icon, the drop down will only show locations (no systems). In this view the housing objects are included and will be shown under the building/floor where its entrance is located. If the housing contains more than one building space, they will appear under the housing node. Notice that the tree will only show the housing objects that have a valid housing location (connected to a building space).
 Housing view
Locations with located systems
This view shows the location structure and includes the system objects where they are located.
 Location tree with systems that are located
Systems with locations
This view is the opposite to Locations with located systems described earlier. Here you see the systems in a tree view, and where the system is located, the location(s) will appear under the node.
 System tree view with location
All
This view will show all locations and systems under separate nodes/folders.
 All locations and systems
As an extra info we want to point out that in each of these views you can enter a search string to quickly navigate to the object you want to select.
 Search string with result
Action to create or/and connect locations to systems through 2D drawing
Now we have added a possibility to create or localize a system by right clicking on a 2D drawing polygon (actions are configurable on your user role). Notice that these two actions are mostly the same, but most likely you only need one of them based on the type of system you use in your database (CCS - above or SfB/NS - below).

When the action window opens up you can either select to add a new object to the selected location or choose to connect to an existing system object.

If you connect to an existing system object, you select it from the object field and then press Add.

If you want to connect the location to a new system object, select that choise and fill out parent or/and object type. You can also write a name for the object, but as default is is the object type name. When you have done your selection, press Add.

After you have added your located object, you can see where systems are located on your 2D drawing.

Connect sites to real property
When importing site and building information from external official registry like BBR (Denmark) and Matrikkel (Norway) MainManager has usually registered these information as real property and connected this to site/building. We have now added a possibility to register this manually. You can either go to sub data on site and register the real property there, or run an action from a site to connect to an existing real property.
In property box for a site, you can view real property data, and if none existing, you can create new.
 Real property data on site. New registration can be made that will be connected to this site.
 Registration window for a real property
If you have already registered a real property and want to connect it to a site afterwards, you can go to the action menu from a specific site and select the action Connect real property. In the action you select the real property you want to connect.
 Action to connect real property to a specific site
Helpdesk, Operation and Maintenance
Following additions are specifically related to Helpdesk and Operation and Maintenance processes
Register service partner
We have created a new action that should make it easier to register a service partner on site (or object). In this action it is either possible to select from an existing list of organisations or create a new one. The action can be configured to appear as a button above the list is called Create service partner
 Create service partner action
The action window will change a little according to the choice you make in the top drop down list. If you want to register a service partner from an existing organisation, you select company and employee and fill out the rest. Otherwise if you want to create a new company, you will have to begin by registering the company and contact info, then fill out the rest of the service information.
 Action in two different "modes" - selecting existing company on the left and creating new company on the right
Incident types
In prior versions of MainManager FM we only opened up for a few of the available incident types from V11. We have now added all incident types, so customers using many different types are now able to view them all either in helpdesk process or through Operation and Maintenance process.
 An example from a helpdesk process with many types of incidents in
Inspections
We have been designing and implementing our inspection module into MainManager FM in the last couple of months and now we can introduce shortly what is possible for this module. The setup of checklists etc. is (for now) the same as in V11 and is accessible through Standard task step in Operation and Maintenance process.
Now it is possible to view all inspections in a list, see their status and click on it to open it and perform a moving in/out inspection
 Inspections in a list view
When opening the inspection, you see a tab for each object you have to perform an inspection for. In this case it is each building space within an apartment. The inspector presses each object and fills out the checklist for each object and makes comments where needed.
 An overview of the objects that must be inspected - here they have all been filled out
In this example we also have the opportunity to access and view the checklist through a 2D drawing.
 The building spaces to perform the inspection on are also shown colored on a 2D drawing
The inspector then goes through the checklist for each object.
 Checklist filled out
If the inspector has a comment to any of the items, he can write them down, take picture etc. and save. This will be registered in MainManager as a check item (type of incident) that awaits handling.
 Comment made on an inspected object
When the inspection has been finished, it is possible to have signatures on it and send out a report with the results.
Administration functionality
First of all we would like to point out that we have made some small changes regarding moving some steps around within processes. This is done to make the process flow as similar throughout the system and putting data that relates to setup all in the same place etc.
Access Management process
Here we have changed the setup a bit so that in the first step you will find the organisation structure along with the list view for companies, departments etc.
 First step with all the possible substeps after this change - organisation information
  Second step contains information regarding portfolios and site/portfolio access
 Person/User registration and user role management is now in third step of the process
Operation and Maintenance process
In this process we have moved the Standard task step over to the right. It now contains setup of standard tasks and the connection of them to main types along with checklist setup and management.
 Standard task step has been moved further to the right
Administrator role
Following changes and additions are only adjustable for those who are marked as Administrators (on a user role).
Information field
As an administrator you can go to Edit mode for a specific window (module). Through there we have made some improvements and one of them is an information field. This is an open HTML field where you can write some information that you want to appear for all users when they open the property box in this module (either in new registration or open an existing record from the list).
 HTML field where an Administrator can write some information to all users of this module
After this, the window will contain this information at the top.
 Registration window for Failure where an Administrator has a registered some information to users
Notification fields
Some fields in the system can have a specific logic behind it like some information or warnings. As an example of this you can attach hazard text to either location or system objects in the system (action - Update hazard text). Here we point out how this information is shown in MainManager FM. A message will appear below the field after you make a selection from a drop down list where the content has some information.
 Example from a building that has a hazard text attached. Message appears below the building when it has been selected
Adjustable drop down lists
An Administrator can now decide through the edit mode for a module how information in drop down lists is displayed and selected in the property box and/or filter. This is represented with a new icon above the fields where the content is a drop down list. You simply press the icon and select how you want to i.e. filter on the data. Following we take an example from Fault category for the incident type Failure.
 Edit mode for the module Failure. Field type icon is available for drop down list fields.
When clicking the icon in this example you get the following options on how you want to filter this data.

The options will have affect on how you filter the data in the following way:
Checkbox list
 User can filter on more than one fault category
Multiselect drop down list
 User can select more than one fault category from a list
Singleselect drop down
 User can only select one fault category at a time from filter
Var denne artikel en hjælp?